There is no doubt that out of three big JavaScript frameworks React is the most wanted one (Angular and Vue complete the big trio). In the latest State of JavaScript survey, out of more than 20 000 JavaScript developers, 64.8% of them declared that they have used React before and that they would use it again and 19.1% of them also said that they have heard of it and that they would like to learn it.
Developers mostly love it because of the speed and freedom that React gives them when building their apps. Since there are many ways how you can develop your app and even more components and tools which you can use with it, it’s easy to look on React as Lego of frontend development. It can be very exciting to know that you can play around and try all of those available tools, but it can also be scary, especially if you already suffer from the frontend fatigue or you’re just a beginner in the world of React.

It is important to go step by step to avoid confusion. First, you should prepare your environment and make sure that everything is bundled as it should be and that you can change your configuration easily along the way. Then think about how you’re going to structure your code base - reusability, code splitting and modularity should be on top of the list. A good structure will make your code readable, not only to you but to other developers and you won’t need to aimlessly search inside every folder when you come back to your project after a few months. Lastly, make use of all those third-party components and libraries which you can freely include and use in your app. You don’t need to reinvent the wheel every time you start writing a new app.
Probably the most important step of those three is to prepare the environment efficiently. If you configure it correctly from the start, the chances are that you won’t need to touch it again, except when adding new features. Therefore in this article, we are going to talk about the environment configuration in React, best practices, and alternatives. We will handle code structure and styling in the next articles.
Boilerplate
Boilerplate is a collection of code and technologies which can be reused to accelerate development. If you have experience with any programming language, then you surely have some snippets of code which you often copy and reuse inside different apps. They’re tested and you know they will work, you just need to modify them based on app requirements. To set up React environment you will almost always need to configure code bundler, JavaScript transpiler, linter, testing library, and state manager. In 90% of the cases this will be the same in every React app and that’s the reason why developers often start with one of many available React boilerplates and modify them when needed.
Create React App
There is an official React boilerplate published by Facebook (which also open sourced React library). It has more than 67 000 stars on Github and it is the most popular tool to kickstart your React app. The chances are that you’ve already heard about it since it has become an integral part of learning and using React. You don’t have to worry about the manual configuration of Babel, Webpack, development server, etc. and it enables you to focus on building your app instead. It is straightforward to use, you just need to have Node installed and you are basically few commands in your terminal away from viewing your app inside the browser. It’s great for beginners and probably the best solution for simple, straightforward web applications.
npx create-react-app my-new-shiny-app
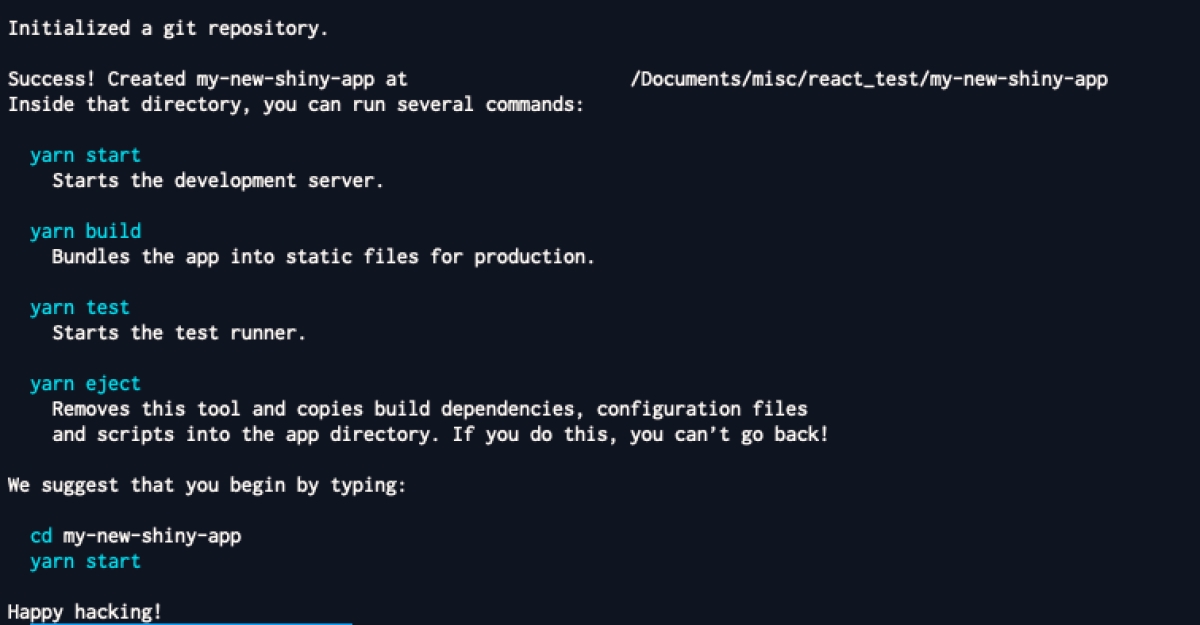
Customization of Create React App is not that easy. You have to rely on ejecting the app or create custom create-react-app scripts, which are not such simple tasks so you should have at least some experience with React build environment before trying something like that. We will write about them on some other occasion, but for now, it is enough to know about them.
React Boilerplate
Unlike Create React App this boilerplate is not for beginners and it requires solid knowledge of React, Redux, unit testing, and linting before starting with it. It is more opinionated than Create React App and aims to combine the best developer experience with the production-ready environment.
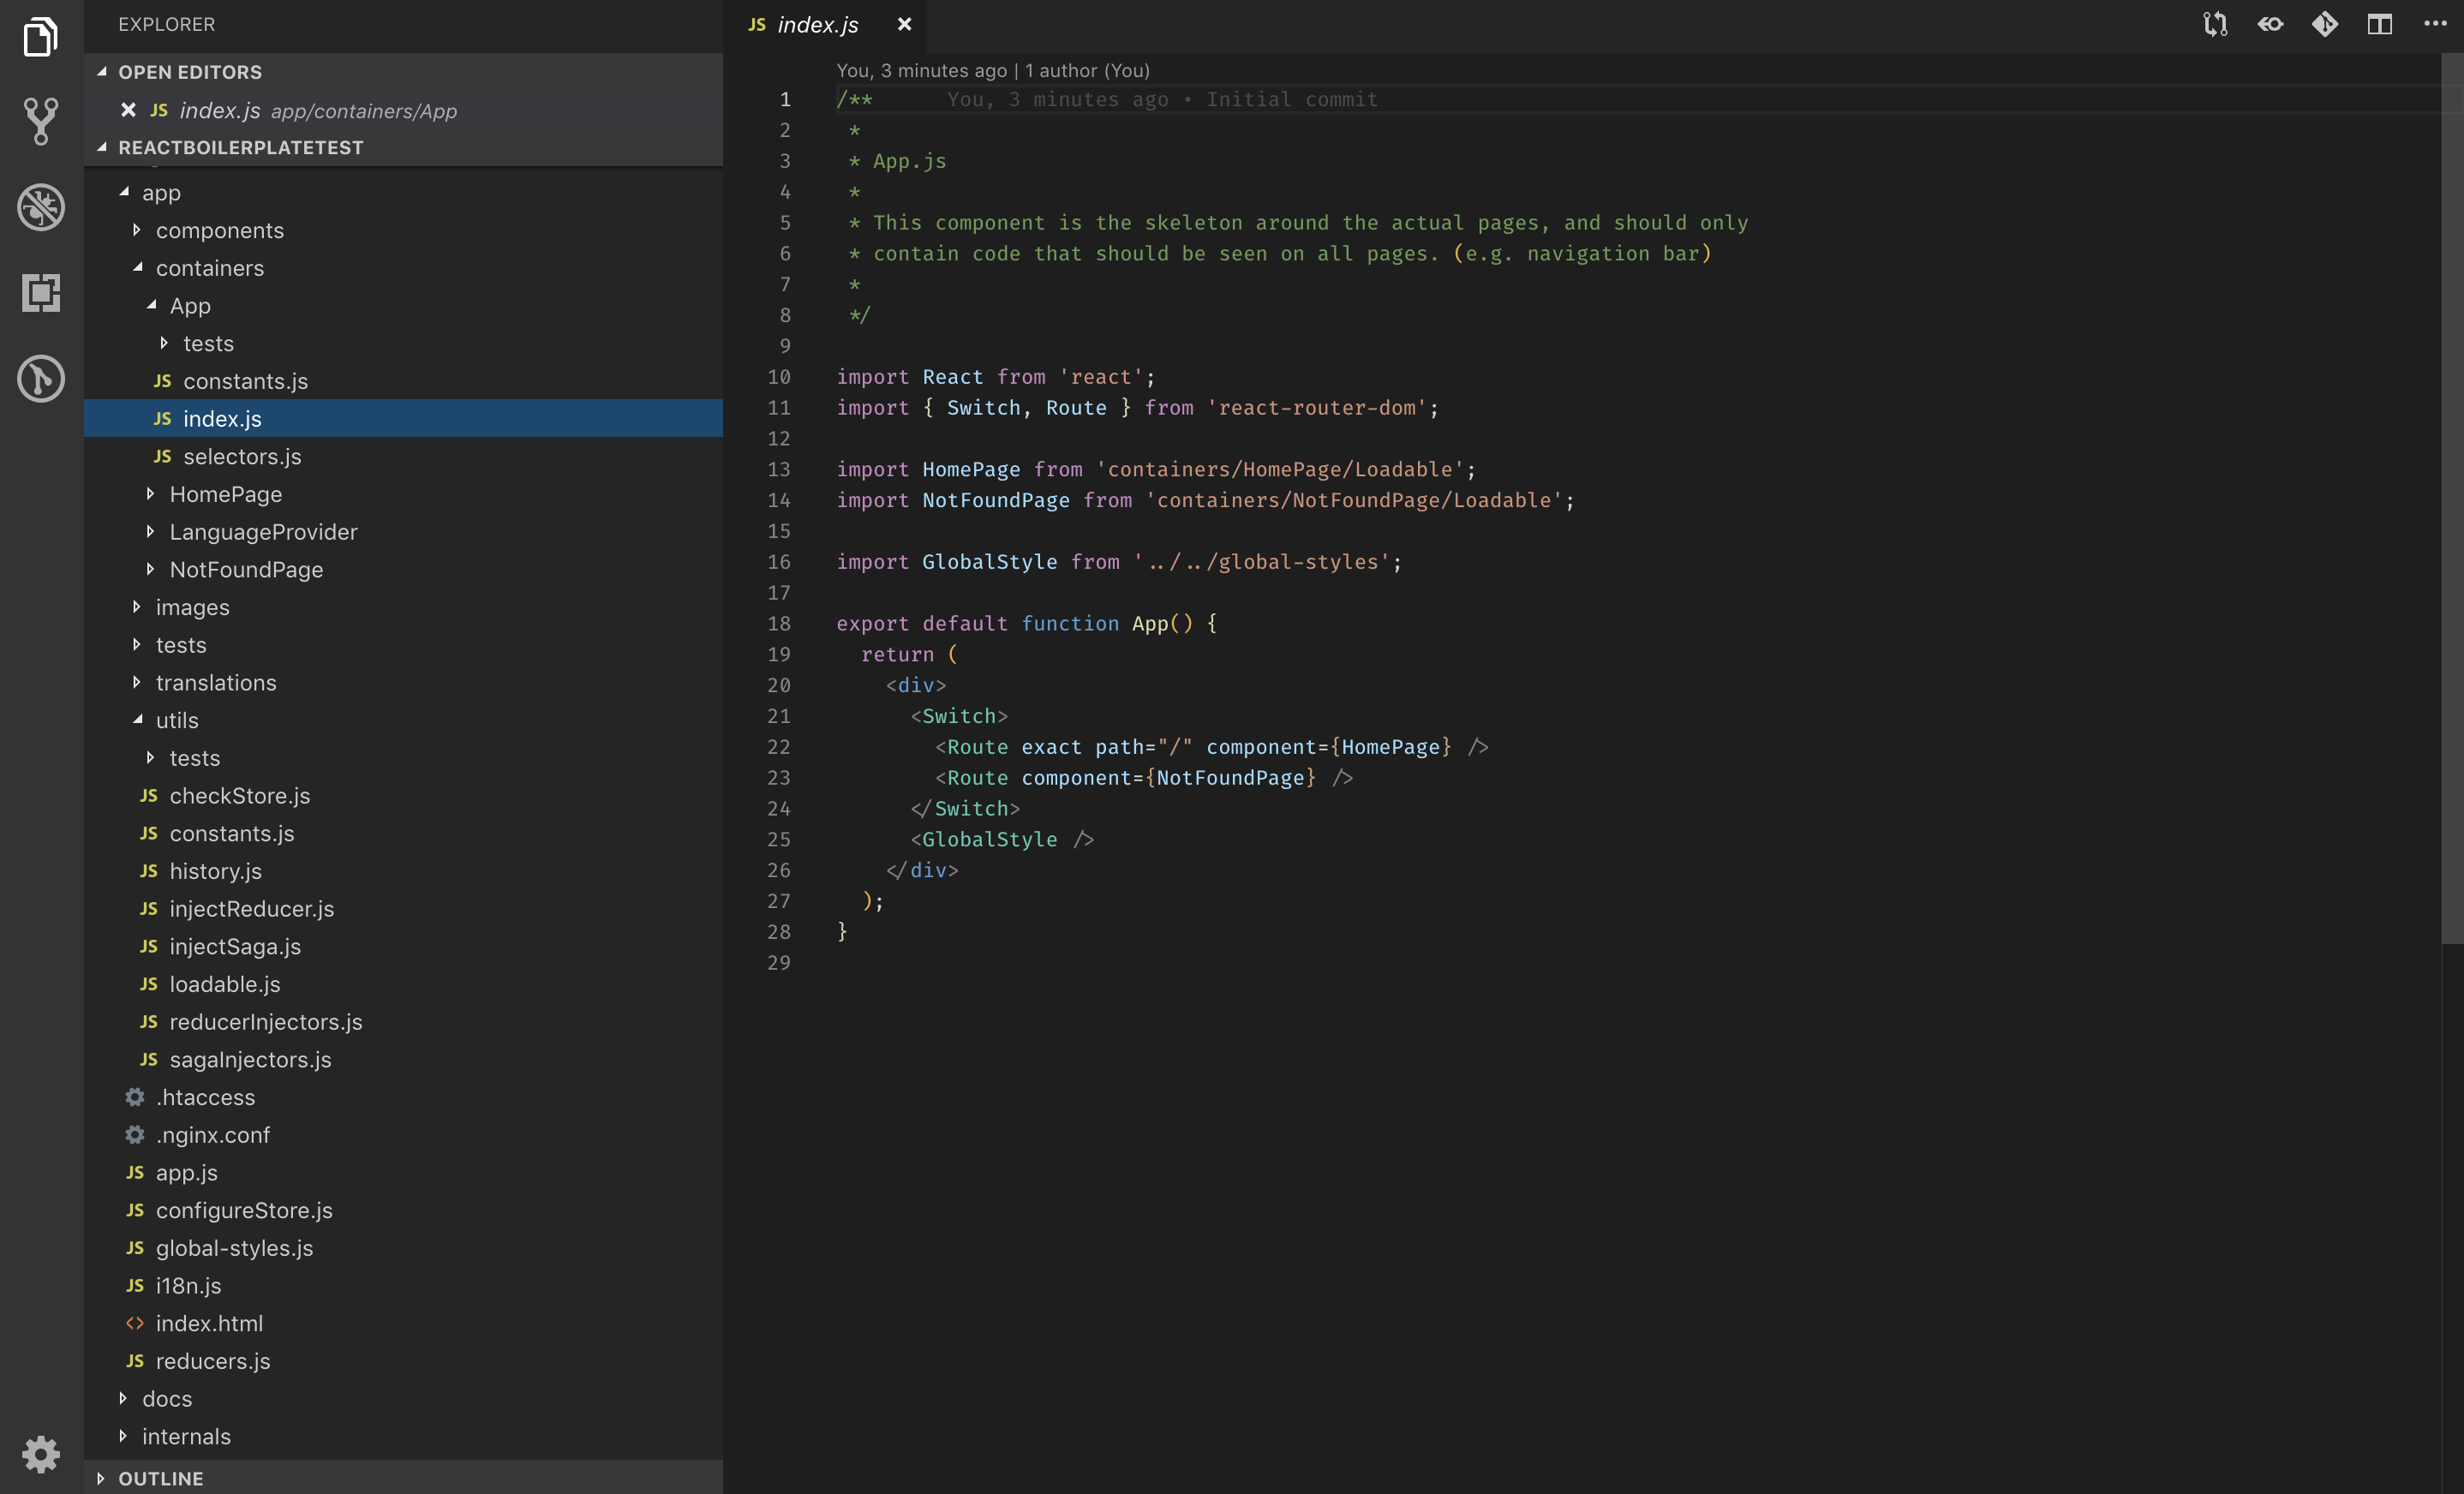
As you can see from the screenshot of my working directory just after the initial setup, React Boilerplate gives you more tools out of the box from the start. Most of them you would probably install or create anyway, but here they are all neatly arranged and configured so you don’t need to. Even the folder structure is organized in advance and for most cases, you won’t need to change it since it is logical, clean and follows some of the best practices in React.
When you start poking around the files you will soon notice that you have more stuff at your disposal. The complexity of the boilerplate is much higher than that in Create React App, so it is very important to go through the boilerplate documentation on their Github page to make sure you understand how it all works together before starting your own project with it.
React Slingshot
If you know you’ll need Redux inside your project, but you want to jump-start your project from the clean-ish start, then React Slingshot boilerplate could be something for you. Redux and other useful libraries like Webpack, Babel, Saas, and Jest will be added to this configuration, but nothing else. Even your index.js file will be empty waiting for your changes.
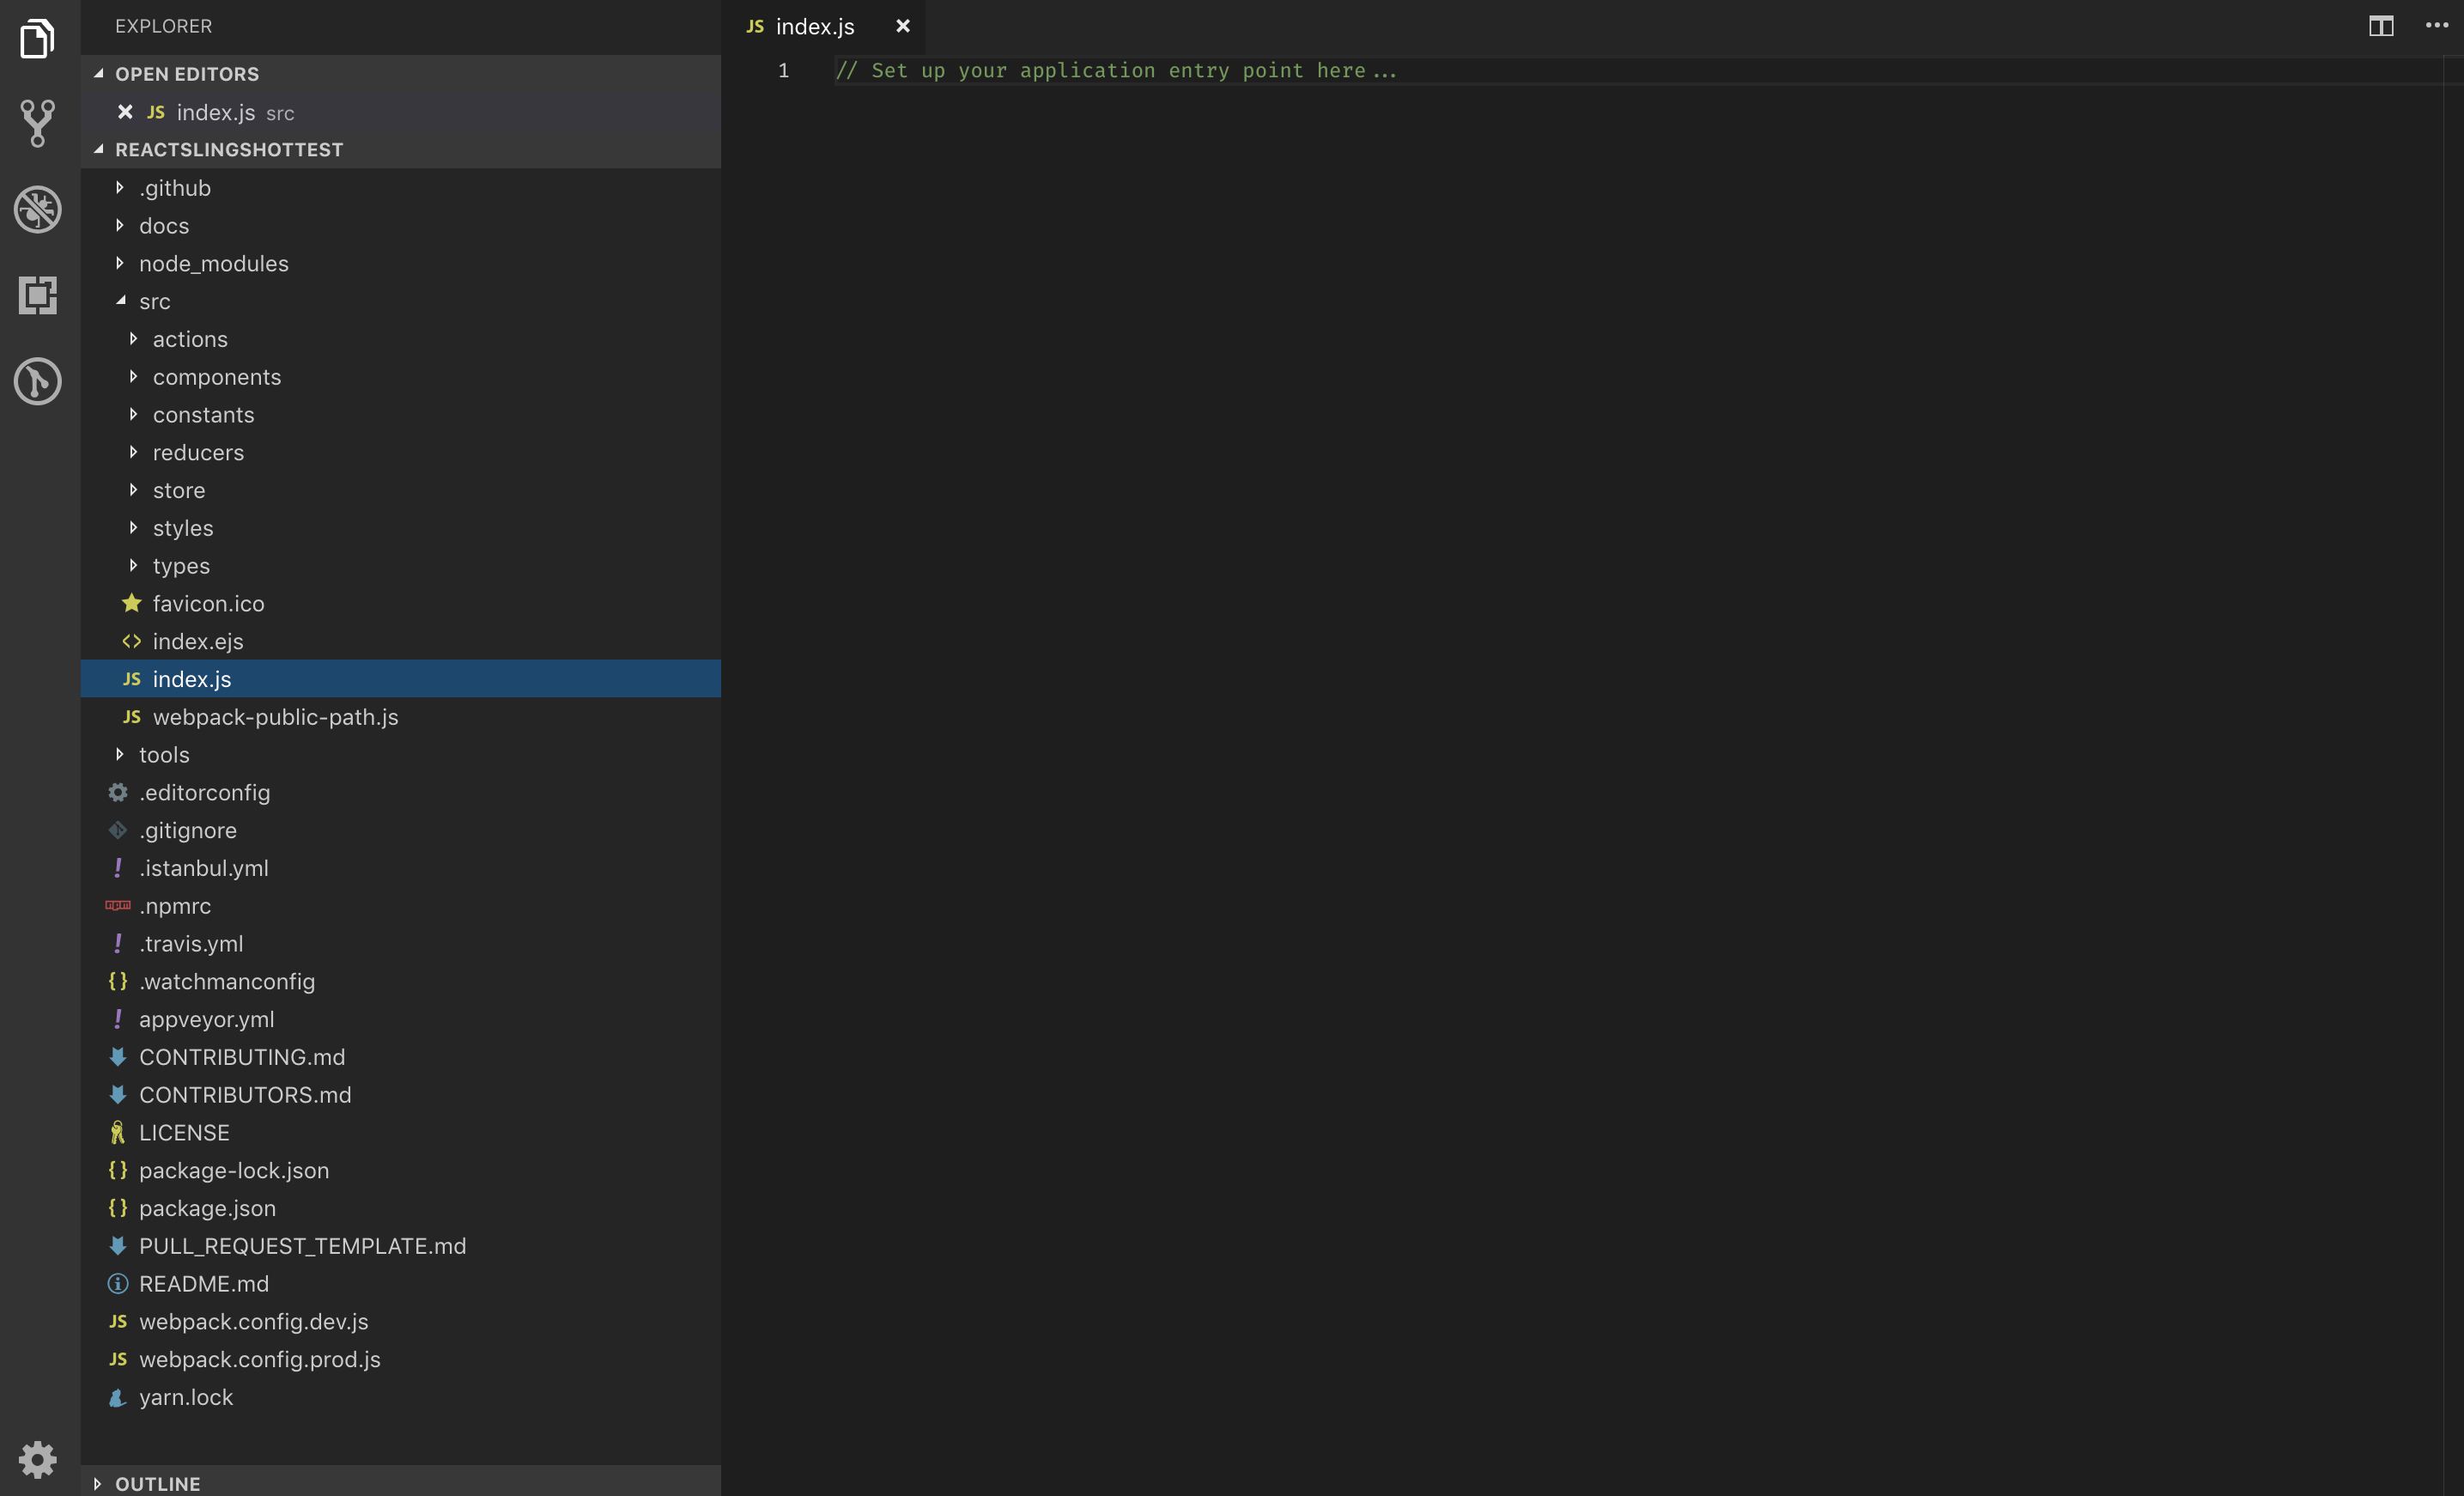
It can look like something went wrong when you delete the example app which is added to the boilerplate because you will face empty, white browser window on your dedicated localhost port, which is quite different if you are used to the Create React App. This is normal behavior here, meaning that the philosophy of this boilerplate is to give you a good starting position and then leave everything else to you.
Like React Boilerplate, it also uses hot reloading, meaning your CSS and JavaScript changes will be shown instantly inside the app. On every change, it will also start any tests you have written inside your app. One minor complaint I have with this boilerplate is that after deleting the example app you get a nasty error message inside your terminal, telling you that test suite failed to run since now you don’t have any tests written. Everything else will work alongside that error, but it could be better without it. Still, all in all this is a good boilerplate to start your project.
Build tools
Boilerplates are a great option to kick off your new React project, but there are cases where using them is just overkill (i.e., when you do not need a vast amount of dependencies they come bundled with). More often than that, you will want to have some custom configuration which is easier done from the start than by modifying the boilerplate code. For that you should be familiar with some other tools, Webpack being the most important one.
Webpack
Webpack is essentially a module bundler, and without it, you can’t write React applications unless you want to keep everything inside one file, rely on CDN-s (content delivery network) and script tags inside your HTML. You can try, but I promise you it won’t be a pleasant experience.
Ideally React application consists of many smaller files which are all connected with a series of import statements leading back to the initial index.js file (actually it can be named any way you like, this is just a convention). This way of writing code is usual in most backend languages and even Node.js, but the support for them on the web is very bad. Webpack makes this possible by creating a dependency graph of your application where every module is mapped and bundled together with others inside one or more bundle files. In the early days Webpack was notorious for its complexity, but today with Webpack 4 it is much easier to configure it and its documentation has become much, much better.
const HtmlWebpackPlugin = require('html-webpack-plugin');

module.exports = {
    mode: 'development',
    entry: './src/index.js',
    output: {
        filename: 'bundle.js',
    },
    module: {
        rules: [
            {
                test: /\.jsx?$/,
                exclude: /node_modules/,
                use: ['babel-loader']
            },
        ],
    },
    plugins: [
        new HtmlWebpackPlugin({
            template: './src/index.html',
        }),
    ],
}
To get started you need to set up the environment (development, production or none), add the entry point of the app (index.js by default) and configure the output options (where and how will the final bundle be saved). To transform files other than JavaScript and JSON, you need to add specific loaders inside module.rules and add plugins if you want to optimize the bundle or make some other tasks additionally. Loaders and plugins sound complicated, but they really aren’t and are in most cases covered with excellent documentation.
Webpack is also used for much more than just bundling your code. Thanks to the community, it can replace most of the task runners like Gulp and Grunt, making the Webpack industry standard in web development today.
Parcel
The Parcel is the new kid on the block promising simplicity and providing the best possible developer experience. You need to create an index.html file with a script tag pointing to the index.js file, and that’s it. The Parcel will use both files as an entry point and work it’s magic around them. No configuration needed, just start it inside the terminal with parcel index.html command and everything will work out of the box. It comes with a development server which can be accessed by default on http://localhost:1234/.
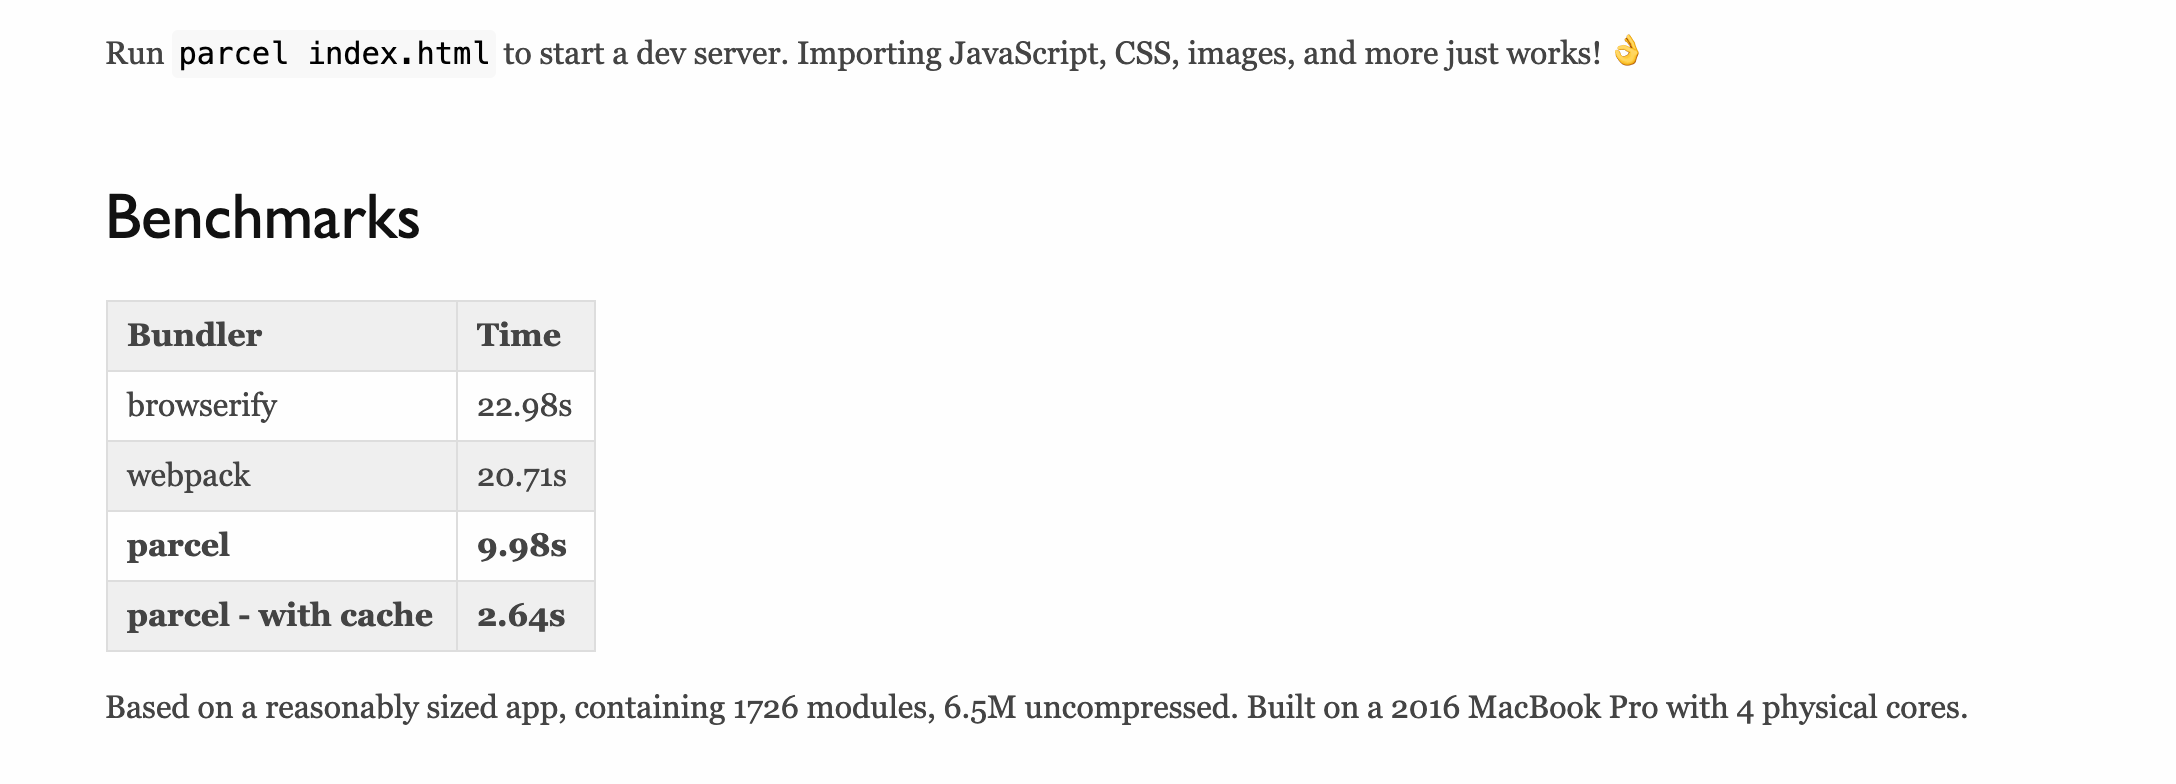
Using Parcel with React is very simple. Add React and React-DOM as dependencies to your project and that’s it. It is the same with everything else like Babel presets and node-sass. The Parcel will detect them and transform your files with really blazing speed. Parcel’s zero configuration philosophy makes it a great option for small and medium-sized projects when you don’t need a lot of custom configuration and you want everything to work out of the box without much tinkering. While it was released in December 2017 it has already made a name for itself and with time it will only become even better.
Babel
React is just plain JavaScript, but for some people it can look very strange since we are mostly using JavaScript ES6 to write our components. An obvious example here is class-based components. Yes, you can replace most of them with hooks, but let’s stick with classes for now until hooks manage to cover all existing features like componentDidCatch lifecycle method or when their integration with third-party becomes better.
ES6 brings a lot of improvements to JavaScript and makes writing JavaScript code much faster and enjoyable, but there is a catch. A lot of older browsers don’t support some or even all of the ES6 features and we should strive to make our applications run in as many environments as possible (okay, maybe we don’t need to cover every browser in existence or even all of the versions of The-One-Which-Must-Not-Be-Named).
To make our modern code ( like ES6, ES7 or more) work in those older browsers we need to transform that code to JavaScript ES5 which all relevant browsers support. This process is called transpilation and Babel is currently the best tool for that. To make use of Babel we need to download and install specific Babel presets for transpiling JSX in React (babel-preset-react) and ES6 to ES5 JavaScript (babel-preset-env). All Babel specific settings will usually go to the .babelrc file or alternatively you can define them through Webpack.
WITH WEBPACK:
- install dependencies:
npm install --save-dev babel-core babel-loader babel-preset-env babel-preset-react - create .babelrc file and add to it:
{ "presets": ["@babel/preset-env", "@babel/preset-react"] } - add to webpack.config.js:
module.exports = {
  ...
  module: {
      rules: [
          {
              test: /\.(js|jsx)$/,
              exclude: /node_modules/,
              use: {
                  loader: "babel-loader"
              }
          }
      ]
  }
  ...
};
WITH PARCEL:
- install dependencies:
npm i babel-preset-env babel-preset-react --save-dev - create .babelrc file and add to it:
{
"presets": ["env", "react"]
}
Eslint
You should write clean code. It should work, but it should also be readable for other developers and this is important for every project you will ever write even if it is for your own purposes. Not only it will look great, but more importantly, it will help you avoid all those little bugs like famous missing semicolon on line xyz which in most cases won’t break your code but it will almost 100% bite you in the ass later.
...
  "eslintConfig": {
    "extends": [
      "airbnb"
    ],
    "rules": {
      "comma-dangle": 1,
      "import/no-unresolved": 0,
      "import/prefer-default-export": 0,
      "jsx-a11y/label-has-for": 0,
      "max-len": 1,
      "no-alert": 0,
      "no-debugger": 1,
      "operator-linebreak": 0,
      "react/default-props-match-prop-types": 0,
      "react/require-default-props": 1,
      "react/forbid-prop-types": 0,
      "react/jsx-first-prop-new-line": [
        1,
        "multiline"
      ],
      "react/jsx-max-props-per-line": [
        1,
        {
          "maximum": 1
        }
      ],
      "semi": 1
    },
  },

  ...
Linters are tools which will help you in that and one of the best out there is Eslint. It is a set of rules which are plugged to your code. They will warn you for every rule break or even stop the code from executing if there are unresolved errors. You can choose from the list of already defined rules or you can also add your own rules. Although Eslint doesn’t promote any coding style you can extend it with a predefined set of rules from companies like Airbnb. That is especially useful if more developers work on the same project. Eslint rules will enforce the same coding style for everyone so the project coding style will be uniform, no matter who works on it.
Developer Tools
Debugging is a magical word in web development and no matter of all the tools available, if we have a choice we will do it inside the browser. It is a natural environment for debugging web applications and besides that Developer tools inside Chrome and Firefox are really awesome out of the box. There is also a plethora of plugins which you can add to their developer tools and React Dev Tools and Redux Dev Tools should be first on your list if you’re going to work with React.
React Dev Tools
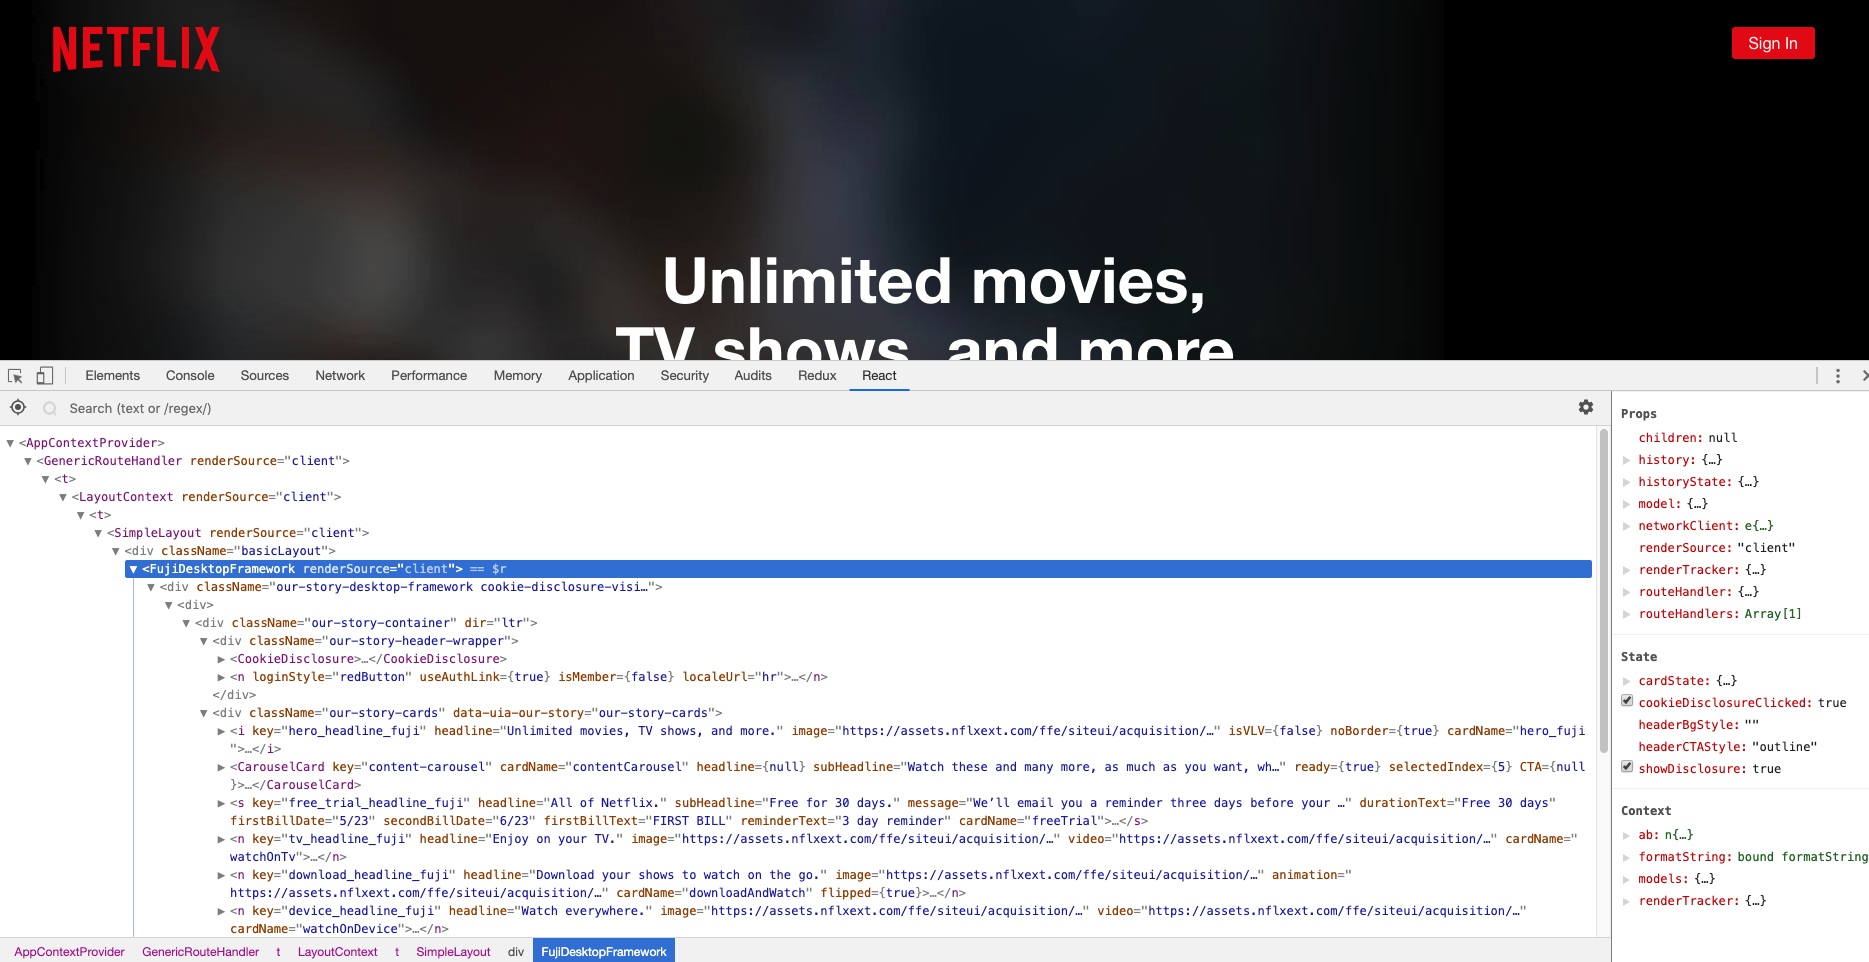
React Dev Tools when installed will add another tab inside your browser developer tools and from inside of it you can inspect your React components and their state and props. It looks and behaves similar to native Elements tab so using it should feel familiar and easy.
Except inspecting the current state of our components you can manipulate some of their state and props properties to see their behavior under different circumstances. It has a great search feature so you can quickly find your component just by using its name in case if your app has a complex component tree.
Redux DevTools
When using Redux sometimes it’s hard to follow all the changes in your redux store, let alone remember or visualize the hierarchy and shape of the objects inside of it. Redux DevTools to the rescue! You can also use it from inside your browser developer tools to see your redux store tree, real-time changes in it, and much more.
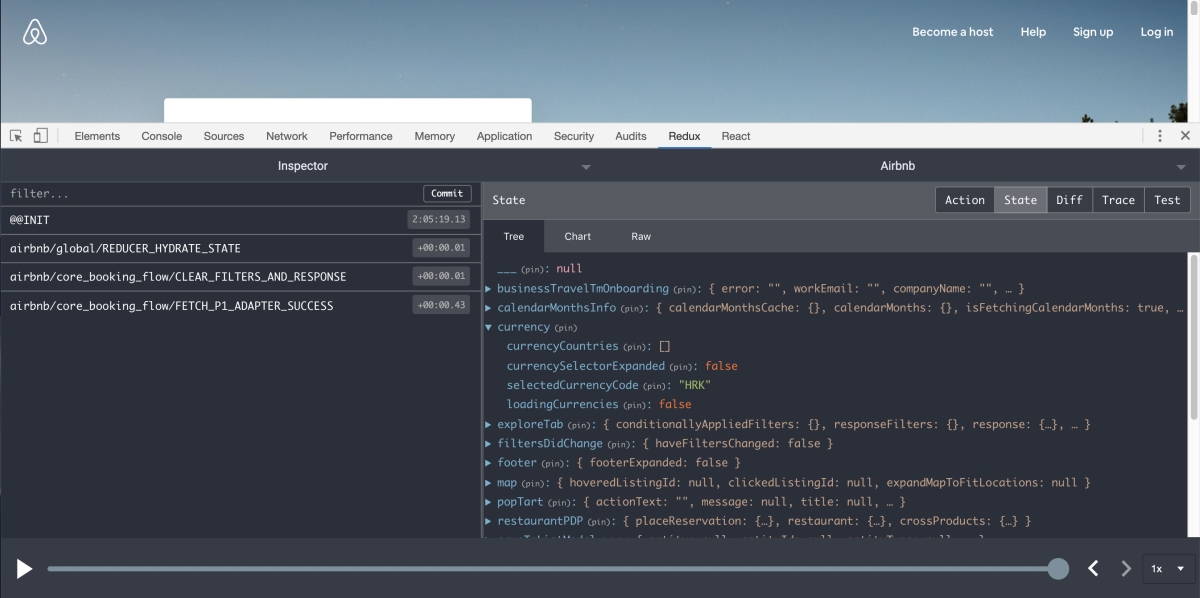
Unlike React Dev Tools you can use and install Redux DevTools on more than one way and you are not limited to only browser environments. The most simple solution is to install it as a browser extension and then enable it inside your index.jsx file.
import React from 'react';
import { render } from 'react-dom';
import { createStore } from 'redux';
import { Provider } from 'react-redux';
import reducer from './rootReducer';
import App from './App';

const store = createStore(
    reducer,
    window.__REDUX_DEVTOOLS_EXTENSION__ && window.__REDUX_DEVTOOLS_EXTENSION__()
);

render(
    <Provider store={store}>
        <App />
    </Provider>,
    document.getElementById('root'),
);
Is that all?
Of course not, we have only covered essentials here to keep this article from turning into a small book. As you will start writing more advanced applications, your environment will change. Knowing what is what will enable you to find solutions fast and easy along the way.
In the next article we will cover code structure inside React project and how to use tools like React Router, Redux, Axios and Lodash to build well organized and efficient application.

