Introduction
There are many interesting problems that rise almost every day in our work. For many of them, one would suspect such problems would have trivial solutions, but more often than not - they do not. Recently, there was one such challenge concerning one Elasticsearch stack. It turns out to have a somewhat complex solution; but because it works neatly, I’ve decided to make a blog post/tutorial out of it. Hopefully, it will also provide a glimpse into that real vendor lock-in experience and the impact it can have. The background story goes like this:
One client had a very simple self-hosted ElasticSearch setup that had outgrown its basic use case. It had turned into a resource-devouring monster. There were frequent OOM’s, long-running queries, the disk space needed to be added more and more frequently, all aiding to a higher frequency of various aches that engineers were experiencing. The decision was quickly made to move to AWS hosted ElasticSearch to take the load of the team, move to a true ES cluster and lessen the overhead for maintaining it.
It still does makes very much sense to configure your own ES cluster. This gives you full freedom (or pain) for configuring and maintaining it, compared to a really simple, very narrow in configuration options and bare SAAS that Amazon provides. Great care is always advised when making delicate choices and there are always tradeoffs.
This is what needed to be done for this particular task:
- Make ES Cluster snapshot and move it to S3
- Restore cluster from S3 to AWS ES
- Make the switch to hosted ES (v5.5 -> v6.3)
                                  ---------> AWS Elasticsearch
                                 /
Filebeat --------> Logstash ----/----//----> self-hosted Elasticsearch
This switch to new Elasticsearch will be done on Logstash in output section. Seems simple enough. But not all has been taken into account here.
Here’s a list of what will we do:
- Assess and analyse current data
- Create an S3 bucket for current Elasticsearch data
- Create and configure AWS Elasticsearch service
- Migrate the data
- Reindex
- Switch Logstash Eleasticsearch output from self-hosted to AWS hosted
- Set up new retention rules
Assess the current cluster state
In this case, we were dealing with a one node cluster, meaning that all cluster data was stored on the same hard disk:
/var/lib/elasticsearch/nodes/0# du -sh .
311G	.
There is more than one way to find out how much data do these indexes use, but this was the fastest. At the birth of this cluster, the indexes were set to daily indices. After 90 days (a number we used for index retention) there were about 750 indexes:
~# curl localhost:9200/_cat/indices | wc -l
754
Index analysis
Indexes are created with default parameters, meaning 5 shards and 1 replica (per shard). This default setting is arbitrary, but completely unnecessary for a one node cluster. These indexes were analysed in detail. New indexes will have shard and replica settings addressed properly. There is also no more need for daily indices, so they will be reindexed to monthly indices.
The “How many shards?” question
I will elaborate this on an example. If you remember, Elastic recommends a maximum of 32GB of heap space. We round this down to 30GB - and there’s your number for maximum shard size. Amazon suggests having shard size somewhere between 10 and 50 GB.
See what the indexes have to say:
# curl -s localhost:9200/_cat/indices | grep elasticsearch | grep 08.2018 | sort -k3
yellow open elasticsearch-01.08.2018 45umguBjTXq8EcKUEBGUzg 5 1  4863876 0    2.4gb    2.4gb
yellow open elasticsearch-02.08.2018 TDweCn-4SsG7yE8gkjvdww 5 1  5109183 0    2.5gb    2.5gb
yellow open elasticsearch-03.08.2018 mvtkpYAYTx-zICNrGhTPLQ 5 1  5121859 0    2.6gb    2.6gb
yellow open elasticsearch-04.08.2018 EW7NhSgHTKq06Tv1JBuS1Q 5 1  5155486 0    2.6gb    2.6gb
yellow open elasticsearch-05.08.2018 ReeYsMx1RWCTl-lNud_Q-g 5 1  5211589 0    2.6gb    2.6gb
yellow open elasticsearch-06.08.2018 ZZlhwLbCRoKgQRJJX3GjZA 5 1  5117979 0    2.6gb    2.6gb
yellow open elasticsearch-07.08.2018 qnbvjM7dS_qhxAKTxJNsBA 5 1  5128517 0    2.6gb    2.6gb
yellow open elasticsearch-08.08.2018 _k0fLqloTUCexvuN2oZ-Yg 5 1  3549812 0    1.8gb    1.8gb
yellow open elasticsearch-09.08.2018 Fx6DSDepRxya-jqucCf_3Q 5 1   249300 0  126.2mb  126.2mb
yellow open elasticsearch-10.08.2018 NswVaO5RQU6Wh_3PwI6L7w 5 1   656467 0  330.1mb  330.1mb
yellow open elasticsearch-13.08.2018 j08YQ7rAQZOktuOCHp_t3A 5 1   365835 0  184.7mb  184.7mb
yellow open elasticsearch-14.08.2018 3fTEP8WDSVyAYlYI31us-Q 5 1   405793 0  205.2mb  205.2mb
yellow open elasticsearch-15.08.2018 ZYWudXK8TyqcFgeVTP3NPQ 5 1   819580 0  412.1mb  412.1mb
yellow open elasticsearch-16.08.2018 00kJTXiFQ4C-SYIus1Dt9A 5 1   262790 0  133.1mb  133.1mb
yellow open elasticsearch-17.08.2018 zQfVn70HQ6-2BL_q4xw4Ig 5 1   819800 0  412.6mb  412.6mb
yellow open elasticsearch-20.08.2018 3yU5qRJTSNeSPGn7_BRLRQ 5 1   716160 0  359.9mb  359.9mb
yellow open elasticsearch-21.08.2018 OLjBFK1ySm2OBe9gVucpdw 5 1   820880 0  412.8mb  412.8mb
yellow open elasticsearch-22.08.2018 eftJUs3sQKGPFvfWGmuDyQ 5 1   821550 0  413.3mb  413.3mb
yellow open elasticsearch-23.08.2018 6MsN1pYdQSS0BEdtOiozFw 5 1   820830 0  412.6mb  412.6mb
yellow open elasticsearch-24.08.2018 tuREvnFiROiX-rMRYo0fJg 5 1   820450 0  412.4mb  412.4mb
yellow open elasticsearch-27.08.2018 5GuKZjcWTMKLpWSXMSBngA 5 1   820870 0  412.7mb  412.7mb
yellow open elasticsearch-28.08.2018 palLbZIWSkKHppO9wCjy0A 5 1   818860 0  411.7mb  411.7mb
yellow open elasticsearch-29.08.2018 fR104O8aTXuSNFvY2d2TuQ 5 1  1446927 0  730.5mb  730.5mb
yellow open elasticsearch-30.08.2018 IBIEpwLnR-Gx16Yxmt6cag 5 1  2091715 0      1gb      1gb
yellow open elasticsearch-31.08.2018 tpaUyMSBRSSRXmietbJN-A 5 1  1786610 0  904.2mb  904.2mb
Apart from saying they’re yellow, there are few indexes missing for August, but we can disregard this for now as in this example, this is not an index of great importance.
We sum the indexes (one sum for indexes under 1GB and another for over 1GB):
# curl -s localhost:9200/_cat/indices | grep elasticsearch | grep 08.2018 | awk '{print $9}' | grep mb | cut -d 'm' -f1 | awk '{SUM += $1} END {print SUM}'
6274.1

# curl -s localhost:9200/_cat/indices | grep elasticsearch | grep 08.2018 | awk '{print $9}' | grep gb | cut -d 'g' -f1 | awk '{SUM += $1} END {print SUM}'
20.7
This adds up to ~27GB and we conclude two shards are enough for now. If you wonder why, because it seems that one shard would be enough for August - remember there are six indexes missing for this month and with rolling out new applications (as we do with other indexes), the sum will certainly grow over 30GB. Two shards are enough for now; with careful monitoring, the index settings can easily be adjusted for future months.
The same analysis process was applied to all relevant indexes.
Why are indices yellow?
The status of the indices is yellow because Elasticsearch cannot allocate replica shards to another node (replica shards must not be on the same node where primary shards reside). Changing the replica number to 0 fixes this problem and the indices will say their status is now green.
I’ll put this on another index just to illustrate:
# curl -s localhost:9200/_cat/indices | grep supervisor
yellow open supervisor-23.10.2018    Y6tiESLTS2GYAOskFszubw 5 1   26759 0   14.6mb   14.6mb
yellow open supervisor-17.10.2018    ePdmLyjVRUazonSmOYaGig 5 1   29538 0   15.6mb   15.6mb
yellow open supervisor-20.10.2018    hKoM4ndGR2G5--TKhqVmNQ 5 1   64312 0   33.8mb   33.8mb
yellow open supervisor-21.10.2018    lbA8a0iCQzaVFNo8L5KUlg 5 1   64256 0   33.6mb   33.6mb
yellow open supervisor-22.10.2018    -if4U6HWRQCmffz1zFqbrg 5 1   65231 0   34.5mb   34.5mb
yellow open supervisor-19.10.2018    8NwBHexmTwKI0jNqBTOEKg 5 1   65315 0   34.5mb   34.5mb
yellow open supervisor-18.10.2018    HmuHUNE4QRCPu6ozDLQjCg 5 1   64948 0   34.2mb   34.2mb
Still yellow. Now I’ll change the number of replicas for all supervisor indices to 0:
# curl -XPUT localhost:9200/supervisor-*/_settings -H 'Content-Type: application/json' -d'
> {
>     "index" : {
>         "number_of_replicas" : 0
>     }
> }
> '
{"acknowledged":true}
Finally, check the status again:
# curl -s localhost:9200/_cat/indices | grep supervisor
green  open supervisor-23.10.2018    Y6tiESLTS2GYAOskFszubw 5 0   26759 0   14.6mb   14.6mb
green  open supervisor-17.10.2018    ePdmLyjVRUazonSmOYaGig 5 0   29538 0   15.6mb   15.6mb
green  open supervisor-20.10.2018    hKoM4ndGR2G5--TKhqVmNQ 5 0   64312 0   33.8mb   33.8mb
green  open supervisor-21.10.2018    lbA8a0iCQzaVFNo8L5KUlg 5 0   64256 0   33.6mb   33.6mb
green  open supervisor-22.10.2018    -if4U6HWRQCmffz1zFqbrg 5 0   65231 0   34.5mb   34.5mb
green  open supervisor-19.10.2018    8NwBHexmTwKI0jNqBTOEKg 5 0   65315 0   34.5mb   34.5mb
green  open supervisor-18.10.2018    HmuHUNE4QRCPu6ozDLQjCg 5 0   64948 0   34.2mb   34.2mb
We see now that the indices status is indeed green.
Creating and configuring the Elasticsearch cluster on AWS
Master nodes?
The first thing to ponder is how many instances will your cluster have. Is this number greater or less than 10? If it’s greater, enable dedicated master nodes (point no. 9) when creating your AWS ES cluster.
I have less than 10 instances, which one is the master?
To quote from AWS docs: “When you create a domain with no dedicated master instances, all data instances are master-eligible (node.master=true and node.data=true).”
How much space
Simplified formula is this: Source Data * (1 + Number of Replicas) * 1.45 = Minimum Storage Requirement
When we put in the numbers (~300GB data, an average of 1.625 replicas for future indexes) and get around 1.15TB for minimum storage.
Create ES domain
Enter the “Create Elasticsearch domain” wizard, and enter the name of your cluster in the first step. The second step is the most valuable one. It is here that we select instance types and storage size.
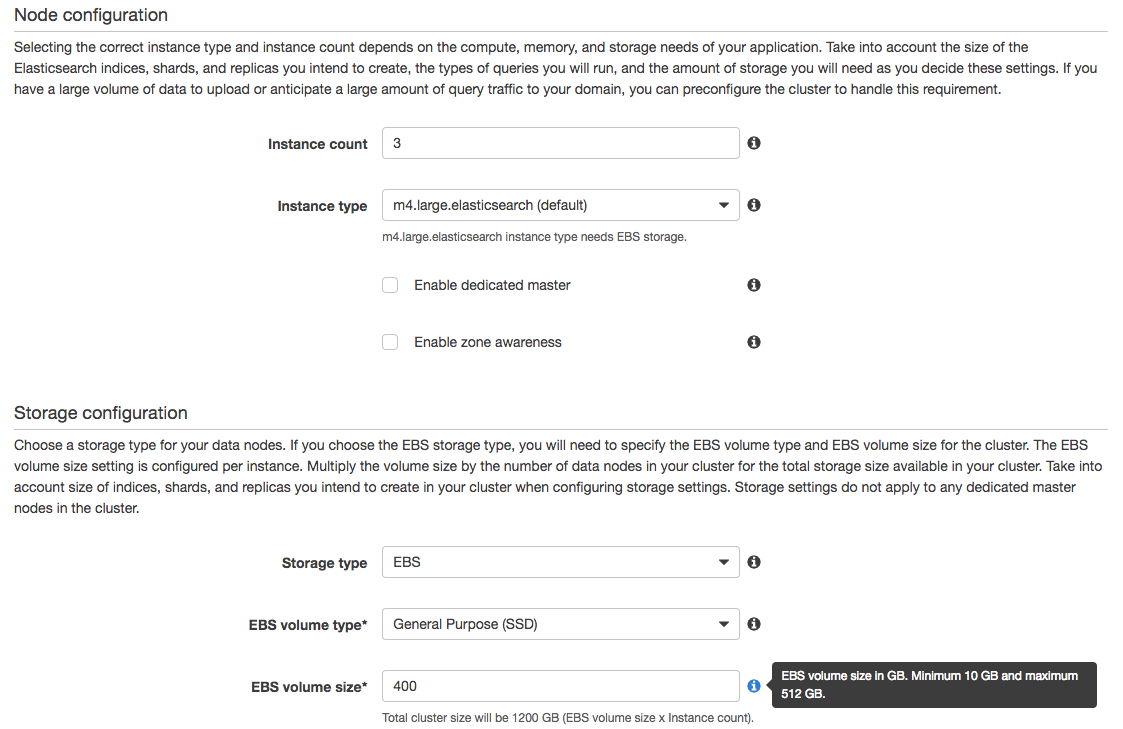
We now have a brand new, fresh and empty AWS Elasticsearch cluster.
Migrate the data
Due to limitations of AWS hosted Elasticsearch, migration cannot be done by connecting two ES clusters and transporting the data from one to another, while reindexing on-the-fly. We work around this by using AWS S3 bucket that will serve as an intermediary.
You are thus required to create an S3 bucket and grant list, read, and write permissions for a new user through AWS access policy. Then you register a snapshot repository on Elasticsearch, after which we can take snapshots of our indexes. Both Elasticseach instances need to have the same S3 bucket registered as a snapshot repository; this is how we connect the data between the two clusters and prepare them for migration. Registering this S3 repository is somewhat more complicated from AWS side and I’ll get to that later in this chapter. Once snapshots are done you may begin taking snapshots - copying your indices to S3.
I’ve named the S3 bucket elasticsearch-monitor and new AWS user is named elasticsearch-monitoring
S3
The S3 bucket has to be in the same region as AWS ES service; otherwise, you won’t be able to register the repository from AWS ES side (it is so at least at the time of this writing).
Creating the bucket and assigning the policy rule to user role is fairly easy so I will not explain this in detail.
The S3 access policy is named elasticsearch-monitoring-s3 and is defined as:
{
    "Version": "2012-10-17",
    "Statement": [
        {
            "Sid": "VisualEditor0",
            "Effect": "Allow",
            "Action": "s3:ListBucket",
            "Resource": "arn:aws:s3:::elasticsearch*"
        },
        {
            "Sid": "VisualEditor1",
            "Effect": "Allow",
            "Action": "s3:ListAllMyBuckets",
            "Resource": "*"
        },
        {
            "Sid": "VisualEditor2",
            "Effect": "Allow",
            "Action": [
                "s3:PutObject",
                "s3:GetObject",
                "s3:DeleteObject"
            ],
            "Resource": "arn:aws:s3:::elasticsearch*/*"
        }
    ]
}
You can check your access to the bucket through aws-cli using AWS access_key and secret_key. I won’t be going into details here as well.
Once you’ve made sure you have correct access to your bucket, the next step is to register this S3 bucket as an S3 repository for Elasticseach. First, we cover self-hosted ES, followed by AWS hosted ES.
Self-hosted ElasticSearch
- Our Elasticsearch is listening on its default port
9200 - Ensure cloud-aws plugin is installed:
sudo /usr/share/elasticsearch/bin/elasticsearch-plugin install repository-s3 - Check installed plugins with:
/usr/share/elasticsearch/bin/elasticsearch-plugin list - Restart ES nodes:
service elasticsearch restartorkill -1 <ES_PID>
You create a snapshot repository for S3 with the following:
curl -XPUT 'http://localhost:9200/_snapshot/s3_repository' -d'
{
  "type": "s3",
  "settings": {
    "bucket": "elasticsearch-monitor",
    "region": "<your_S3_region>",
    "access_key": "<access_key>",
    "secret_key": "<secret_key>"
  }
}'
where the s3_repository is the repository name you choose. Verify the repository with: curl -X POST "localhost:9200/_snapshot/s3_repository/_verify"; if successful, it should return the ID and name of the node that registered.
Send (chosen) data to S3 using:
curl -XPUT "http://localhost:9200/_snapshot/s3_repository/<index_snapshot_name>?wait_for_completion=true" -d'
{
   "indices": "index_1, index_2, exampleindexes-*...",
   "ignore_unavailable": true,
   "include_global_state": false
}
Here you choose the name of the snapshot, let’s say an index name. You can check S3 bucket if the data has been uploaded there or check snapshot status with and API call: GET /_snapshot/_status. This one gets statuses for all snapshots.
These are the necessary steps for a self-hosted ES instance. We’ve migrated the indices as-is to S3 bucket.
AWS hosted Elasticsearch
We register the same S3 bucket as a repository on AWS ES. We need to have several things configured in AWS IAM as the link above specifies:
- USER - use its AWS access and secret keys for authorisation; we’ve already mentioned this user,
elasticsearch-monitoring - ROLE - to delegate permissions to Amazon Elasticsearch Service; I’ve named this
elasticsearch-monitor-role - POLICIES - to fine-tune access permissions; these are
elasticsearch-monitoring-s3andelasticsearch-pass-role(both of these are attached to the USER, but onlyelasticsearch-monitoring-s3is attached to ROLE)
The process of registering the S3 repository is then similar to the process for self-hosted Elasticsearch. The only difference is that for AWS, you have to sign your request and specify the Elasticsearch role in the message body.
PUT https://vpc-endpoint.eu-central-1.es.amazonaws.com/_snapshot/s3_repository
body:
{
  "type": "s3",
    "settings": {
      "bucket": "elasticsearch-monitor",
      "region": "eu-central-1",
      "role_arn": "arn:aws:iam::123456789123:role/elasticsearch-monitor-role"
    }
}
Note that AWS has configured its Elasticsearch port to listen on http/s ports.
I’ve done this using Postman, but it can be also done with Boto.
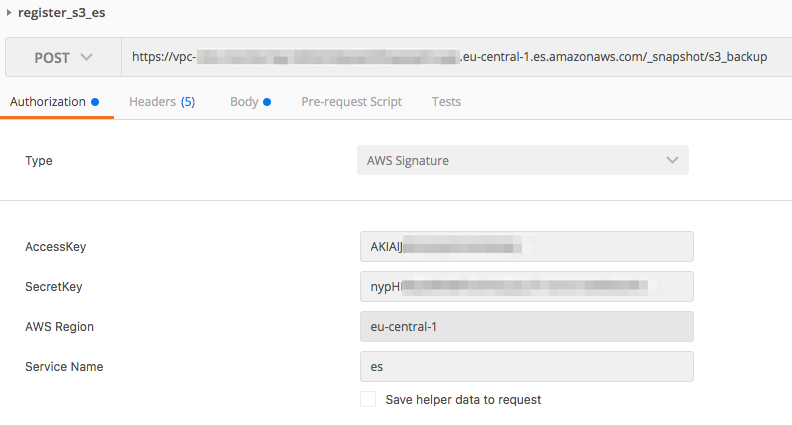
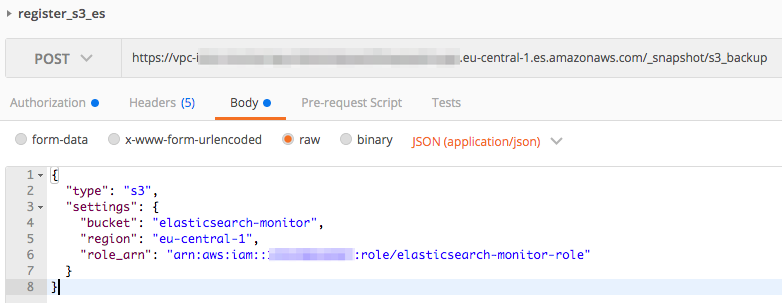
Verification of the repository is the same:
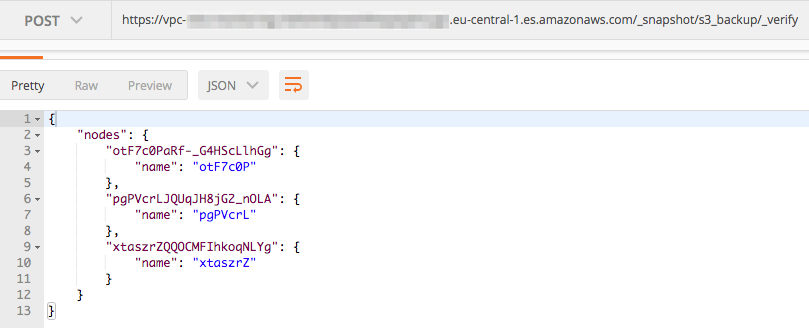
This means we’ve connected our Elasticsearch clusters via a common S3 bucket. If you’ve taken a snapshot by the time you’ve reached this part, you can check below how to list (and verify) all snapshots in the repository by calling your AWS ES S3 repository. The snapshots you’ve uploaded from your self-hosted ES will be shown.
We also need to adjust index templates (do you use them?) for our new cluster.
New index settings
Change existing index template files in /path/to/elasticsearch/index_templates/ and add shards and replica settings:
  "settings": {
    "index.number_of_shards": 2,
    "index.number_of_replicas": 1,
    "index.refresh_interval": "5s"
  },
The settings will usually depend from index to index, so being especially thoughtful here pays off. Put the saved index templates to AWS ES: curl -XPUT https://vpc-endpoint.eu-central-1.es.amazonaws.com/_template/template1-* -H 'Content-Type: application/json' -d@/path/to/elasticsearch/index_templates/template1.json
If you haven’t got index template files and are wondering how to do them, please check here on how to do them or comment below - I might do a post regarding just that.
We can now pull the indices from S3 to AWS ES.
Restore from S3:
This process is fairly straightforward. First, identify registered repositories:
curl -XPOST 'https://vpc-endpoint.eu-central-1.es.amazonaws.com/_snapshot/'
Then identify snapshots to restore:
https://vpc-endpoint.eu-central-1.es.amazonaws.com/_snapshot/s3_repository/_all
This will give snapshot name with all indexes saved under such snapshot To restore data, run:
curl -XPOST 'https://vpc-endpoint.eu-central-1.es.amazonaws.com/_snapshot/s3_repository/snapshot_name/_restore'
Deleting snapshots
You may want to do this if snapshots aren’t correctly uploaded…or just because.
curl -X DELETE "localhost:9200/_snapshot/s3_repository/<snapshot_name>"

curl -X DELETE "https://vpc-endpoint.eu-central-1.es.amazonaws.com/_snapshot/s3_backup/somelog"
Reindexing
After all indices of a snapshot have been uploaded, we can reindex them. As it has been said before, we’ve had daily indices that needed to be reindexed to monthly indices.
POST _reindex
{
  "source": {
    "index": "metricbeat-*"
  },
  "dest": {
    "index": "metricbeat"
  },
Concretely, the command is this:
POST https://vpc-endpoint.eu-central-1.es.amazonaws.com/_reindex -H 'Content-Type: application/json' -d '
{
   "source": {
     "index": "elasticsearch-*8.2018"
   },
   "dest": {
    "index": "elasticsearch-2018-08"
   }
}'
This will select all indices that belong to August (European date format, DD.MM.YYYY) and reindexed them to a monthly index containing all data for August. We’ve also changed the date format for monthly indexes.
Switch Logstash Eleasticsearch output
New incoming data coming into Logstash will not be sent to AWS ES until we tell it so. I’ve been progressively adding indexes to AWS ES one by one using conditionals.
The new elasticsearch output configuration of Logstash is this:
elasticsearch {
    hosts => "vpc-endpoint.eu-central-1.es.amazonaws.com:443"
    ssl => true
    index => "%{[fields][type]}-%{+YYYY-MM}"
    document_type => "%{[fields][type]}"}
The host is AWS ES endpoint listening on https port (otherwise it will default to :9200), ssl is enabled and index naming convention has been altered, so this: %{[fields][type]}-%{+YYYY-MM} will become indexname-2018-10 if the value of type field is indexname.
The complete output section of Logstash looks like this:
output {
    if "_grokparsefailure" in [tags] {
        # write events that didn't match to a file
        file { "path" => "/path/to/grok_failures.txt" }
    } else if ([fields][type] in ["systemlog", "indexname2", "third_index_type"]) {
      # EXPORT TO AWS ES
      elasticsearch {
          hosts => "vpc-endpoint.eu-central-1.es.amazonaws.com:443"
          ssl => true
          index => "%{[fields][type]}-%{+YYYY-MM}"
          document_type => "%{[fields][type]}"}
    } else {
      elasticsearch {
          hosts => localhost
          index => "%{[fields][type]}-%{+dd.MM.YYYY}"
          document_type => "%{[fields][type]}"}
      }
}
New retention rules
Current retention script was running once per week and was closing and deleting indices that were 90 days old. This would be too frequent and redundant for new ElasticSearch cluster, in which we have monthly indices. This means that retention script will run only once per month, to close and delete indices that are more than 3 months old. The script does essentially the same job, but is configured a bit differently.
Retention script
The script uses aws cli and elasticsearch curator libraries primarily.
#!/bin/bash
echo "Activate ELK virtual env"

source  /path/to/elk/virtualenv/bin/activate

echo "Curator: Close indices older than 3 months - AWS ES"
curator_cli --use_ssl --host vpc-endpoint.eu-central-1.es.amazonaws.com --port 443 close --filter_list '[{"filtertype": "period","period_type": "relative","source": "name","range_from": -3,"range_to": -3,"timestring": "%Y-%m","unit": "months"},{"filtertype":"kibana"}]'

echo "Curator: Delete indices older than 3 months - AWS ES"
curator_cli --use_ssl --host vpc-endpoint.eu-central-1.es.amazonaws.com --port 443 delete_indices --filter_list '[{"filtertype": "period","period_type": "relative","source": "name","range_from": -3,"range_to": -3,"timestring": "%Y-%m","unit": "months"},{"filtertype":"kibana"}]'
Time range selection is done here:
 "range_from": -3,
 "range_to": -3,
 "timestring": "%Y-%m",
 "unit": "months"
Basically, it matches indices that are T-3 months “away” from now, and it matches them for time format as specified, %Y-%m (YYYY-MM).
All that’s left is to configure a cronjob for this job:
# m h  dom mon dow   command
15 0 1 * * bash /path/to/retention/scripts/aws_es_retention.sh > /path/to/retention/scripts/aws-res-$(date +"%Y-%m-%d").txt
Note I have found out that AWS ES has not allowed for indices to be closed. Reasons for this are to be studied further:
ERROR Failed to complete action: close. <class 'curator.exceptions.FailedExecution'>: Exception encountered. Rerun with loglevel DEBUG and/or check Elasticsearch logs for more information. Exception: TransportError(401, u'{"Message":"Your request: \'/indexname-2018-07/_close\' is not allowed by Amazon Elasticsearch Service."}')
The deletion, however, was executed without errors.
Tips
Checking reindex status
During reindexing, you may check the status using _tasks API:
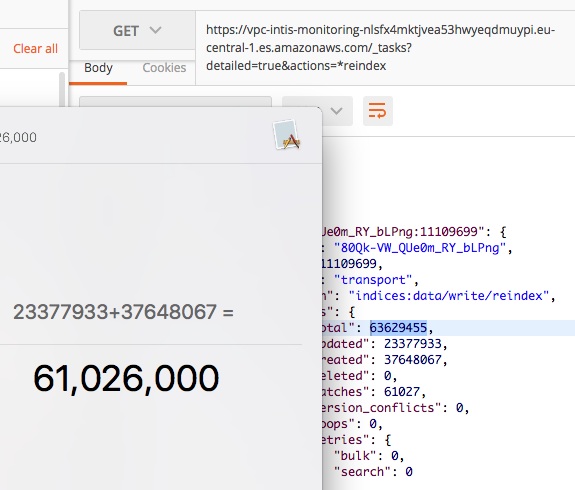
The sum for updated, created and deleted should amount to total. In the image below we can see that this task is relatively close to being done - only 2.6 million documents left to process!
Cancelling Elasticsearch reindex tasks
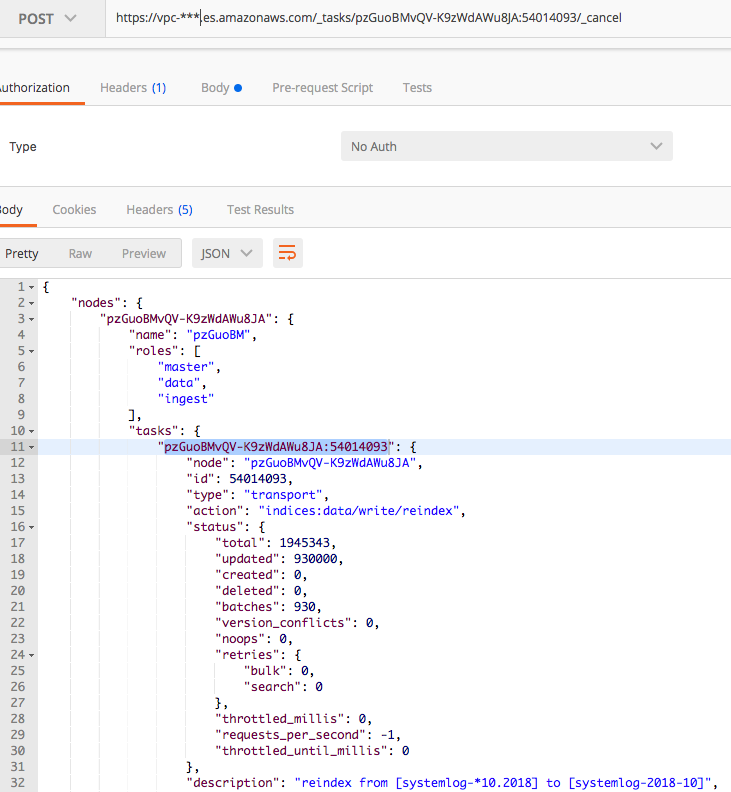
If a mistake was made and you would like to stop reindexing immediately, this can as well be done through the _tasks API. Acquire the task ID first by checking reindex status (as shown in the snapshot below). Then send a POST request method with the ID to the _cancel API. To be able to do so, the task itself first needs to be cancellable.
If you’ve managed to get this far, you should now have all the information for moving your ES data to AWS Elasticsearch Service. If you think there’s something missing, have a question or just something to say, drop a comment!

